
The South Carolina Lowcountry is one of the best-known areas on the East Coast for finding fossilized shark teeth. From beaches to inland creeks and rivers, fossils can be found throughout the region. This guide covers where to look, how to get started, and what you should know before your first hunt
What you will Learn in This Guide:
1. Getting Started
• Why Shark Teeth are Found Here in the First Place
• Teeth and Other Fossils You Can Expect to Find
• Recognizing a Fossil Shark Tooth
2. Beach Shark Tooth Hunting
• Where to Hunt
• When to Hunt
• Where Specifically to Look on the Beach
• How to Search
• What to Bring
3. Inland Shark Tooth Hunting (creeks, drainage ditches, etc.)
• Where to Hunt
• How to Recognize a Productive Area
• How to Search
• What to Bring
• Construction Site Overview
• River Hunting Overview
4. Other Info
• Laws, Access & Ethics
• Identify Your Finds
• Where to Go Next
1. Getting Started
• Why Shark Teeth are found here:
The Lowcountry looks very different today, but much of the area was once covered by warm, shallow seas. Areas that are now Charleston, Summerville, and the surrounding Coastal Plain were part of a broad marine basin known as the Charleston Embayment, home to sharks, rays, fish, sea turtles, and marine mammals. As these animals died, their remains became buried in sediments on the seafloor.
Over time, those sediments formed fossil-bearing layers that still lie beneath much of the Lowcountry today. Erosion, rivers and creeks, construction, and coastal processes continually expose and redistribute material from these layers. This is why fossilized shark teeth can be found not only along today's beaches, but also in creeks, riverbanks, and other locations surprisingly far inland!
• Teeth and Other Fossils you can Expect to Find
Shark teeth are the most recognizable fossils found throughout the Lowcountry, but they're far from the only finds. Depending on where you hunt, you may encounter fossilized ray plates, vertebrae, shells, marine & land mammal bone (including mammoth, giant ground sloth, dugongs, horses etc.)
Most shark teeth you'll find are relatively small, so don't head out expecting a giant megalodon tooth on your first trip. Learning to recognize smaller teeth and fossil material is part of becoming a better hunter!
• Recognizing a Fossil Shark Tooth
Fossil shark teeth can vary significantly in size, shape, and color. While black teeth are common, fossils can also be gray, brown, honey-tan, blue, or other colors depending on the minerals present in the surrounding sediment during fossilization.
Most shark teeth have two easily recognizable parts: the crown (which forms the pointed portion of the tooth) and the root (which anchors the tooth in the sharks jaw. The crown is typically smooth and may retain a shiny, enamel-like appearance, even after fossilization. In contrast, the root usually has a duller, more porous texture. This difference in texture can be especially helpful when trying to distinguish a worn shark tooth from an ordinary rock or shell fragment.
If you're new to fossil hunting, the Shark Tooth Anatomy guide is a great place to learn the basic features of a tooth. You can also learn why fossilized shark teeth come in so many different colors and what those colors can tell you about the conditions in which they fossilized.
2. Beach Shark Tooth Hunting
• Where to Hunt
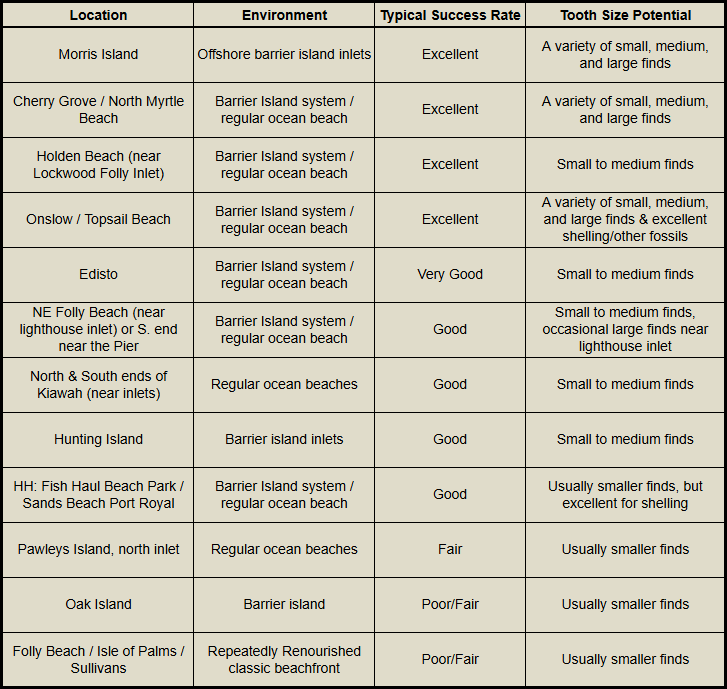
Not every beach is equally productive for shark tooth hunting. Some stretches of coastline (as well as barrier islands) regularly produce fossils, while others may have very little exposed fossil material. Choosing a beach with a known history of shark tooth finds is one of the best places for a new hunter to start. Visit the shark tooth hunting locations page for a comprehensive list of beaches and what you can generally expect at each (also pictured below).
Certain coastal features can also make one area more productive than another. Beaches near inlets and tidal creek mouths are worth paying particular attention to because stronger currents continually move, sort, and redistribute sediment. These processes can concentrate heavier material, including shells, phosphate pebbles, gravel, and fossil shark teeth.
Eroding stretches of beach can also be productive. As sand is removed, older material that was previously buried may become exposed and redistributed along the shoreline.
Dredging and beach renourishment can change fossil hunting conditions as well. Depending on where the new sand originated, a project may introduce fossil-bearing material to the beach, expose older deposits, or temporarily bury productive areas beneath new sand.
Coastal conditions are constantly changing. Even a beach known for shark teeth won't produce everywhere or on every visit. Starting somewhere with demonstrated fossil potential simply gives you a much better place to begin!
Last Updated: June 2026
• When to Hunt
You can find shark teeth at almost any tide, but certain conditions make searching considerably easier. Low tide and the hours leading up to it are generally a good place to start. As the water recedes, more of the beach becomes exposed, including shell beds and other material that may have recently been moved or sorted by the waves
Some favorable conditions include:
• Low tide or falling tide: Exposes more shoreline and allows you to follow newly uncovered shell and debris lines.
• Low surf: Calmer water makes it easier to see material near the waterline and search areas that would otherwise be repeatedly covered by waves
• Recent storms: Stronger waves and currents can erode the beach, move large amounts of sediment, and expose material that was previously buried
• Offshore winds: winds blowing from land toward the ocean can push surface water away from shore and sometimes create lower-water conditions that expose more of the beach
A useful strategy is to arrive an hour or two before low tide and follow the receding waterline. This gives you time to inspect areas as they become exposed rather than arriving after other hunters may have already searched them.
Also know that beach conditions constantly change. A stretch that produces nothing one day may look completely different after the next strong tide or storm!
• Where Specifically to Look on the Beach
Beach hunting in the Lowcountry is less about covering miles of sand and more about recognizing where waves and currents are sorting material.
Shark teeth usually aren't distributed evenly across the beach. Waves move lighter sand more easily than heavier shells, rocks, phosphate pebbles, and fossils. Under the right conditions, that sorting process creates small areas where heavier material becomes concentrated. Those are the areas worth slowing down and searching carefully.
In general, look for the following:
• Shell lines and shell beds: Lines of broken shells left by waves are one of the easiest productive areas to recognize.
• Shell hash, gravel, black sand, and phosphate pebbles: Coarse material mixed together can indicate that waves are concentrating heavier objects. Shark teeth can easily disappear among this debris.
• Cuts, troughs, and low spot: Depressions in the beach can trap shells, gravel, fossils, and other heavier material as water moves across the sand.
• Along Jetties or similar structures: These can interrupt normal currents and sediment movement, sometimes exposing or concentrating shells and other material nearby.
Once you encounter one of these areas, slow down. A 20-foot stretch containing the right material can be more worthwhile than walking hundreds of yards across clean, featureless sand.
• How to Search
There are two main ways to search for shark teeth along South Carolina beaches: visually scanning the surface and sifting through loose material. Visual scanning is generally the more common (and more effective) approach on Lowcountry beaches, while sifting is especially popular in places like Venice Beach, Florida, where local conditions make it particularly effective.
Visual Scanning:
The biggest mistake beginners make is simply walking down the beach looking for obvious black triangles. Instead, treat scanning as a deliberate process.
Walk parallel to the shoreline along a promising shell line, gravel band, or other area where material is being concentrated. Rather than staring directly at your feet, scan roughly 3–5 feet ahead of you. Sweep your eyes slowly from side to side across a manageable section of beach as you move forward.
Most importantly, train yourself to recognize shape before color. Many Lowcountry fossil shark teeth are black, dark gray, or brown, but fossilization can produce teeth in a wide range of colors. Searching only for black objects can cause you to overlook lighter teeth—and it can make every phosphate pebble look interesting.
Instead, look for features such as:
• A triangular or pointed crown
• Straight or curved cutting edges
• A recognizable root shape
• Smooth, sometimes shiny enamel that contrasts with the more porous-looking root
Don't expect every tooth to be sitting perfectly exposed on top of the sand. You may only see the tip of a crown, one cutting edge, or part of the root sticking out between shells. When you find a promising concentration of shell hash or gravel, slow down and scan it more than once. Changing your viewing angle or taking a step backward can make a tooth suddenly stand out even though you looked directly over it moments earlier.
Over time, this becomes much easier. Once your eyes learn the characteristic shapes and textures of shark teeth, you'll begin noticing them among shells and debris almost automatically.
To learn more, visit: How to Scan a Beach for Shark Teeth.
Sifting Technique:
• Use a handheld sieve or sand flea rake in shell piles
• Shake gently in shallow water to wash away the sand and micro shell debris
• Inspect what remains slowly rather than dumping it out quickly
• Work small sections thoroughly instead of large areas superficially
*be sure to check local regulations pertaining to sifting to ensure it is allowed. As mentioned, it is more fruitful to simply visually scan for teeth rather than sift on SC beaches.
Even productive beaches don’t produce finds everywhere you walk. Success comes from repeatedly checking the same types of features described above and paying attention to how your local beach changes after tides and storms.
For more information on oceanfront shark tooth hunting, visit: Can you Find Shark Teeth at High Tide and How to Scan a Beach for Shark Teeth.
• What to Bring
Beach shark tooth hunting doesn't require specialized equipment or a complicated setup. In fact, most beach hunting simply involves walking the shoreline and keeping your eyes on the ground. However, a few basic items can make a long day of searching more comfortable.
Our recommendations include:
• Small Collection Bag or Container: a small mesh bag, zippered pouch, or container small enough to fit in a pocket or attach to your waist is usually all you need.
• Sand Dipper/Scoop: particularly helpful for older hunters or anyone who has difficulty repeatedly bending down.
• Polarized Sunglasses: reduces glare reflecting off wet sand and shallow water, making it easier to distinguish shells, rocks, and other objects along the shoreline.
• Sunscreen and a Hat: There isn't much shade along an open beach, and shark tooth hunting has a way of turning a short walk into a few hours of searching.
• Water: stay hydrated, especially during the warmer months!
• Your Phone: not essential but helpful for checking tides & weather conditions or taking photos of your finds
For all of our shark tooth hunting gear recs, visit our Gear Recommendations Page!
3. Inland Shark Tooth Hunting
• Creek and Drainage Ditch Hunting
Small creeks and drainage systems are some of the most recognizable forms of inland shark tooth hunting around Summerville and the surrounding Lowcountry. Water gradually erodes the area's fossil-bearing sediments, freeing shark teeth and other fossils and carrying them downstream. Over time, some of that material becomes concentrated with gravel, phosphate, and other heavier debris along the creek bottom.
The challenge isn't necessarily finding a creek. It's learning which creeks have access to fossil-bearing sediments and recognizing where naturally exposed fossils are likely to collect.
• Where to Hunt
If you are new to shark tooth hunting in the Lowcountry, then you will quickly learn, if you haven't already, that hunters do not like to disclose their hot spots. You will be hard pressed to find productive hunting locations anywhere online (even within the enthusiast Facebook groups).
And understandably so - you give up a location publicly and suddenly it becomes overhunted, overcrowded, or even damaged by folks who haven't taken the time to understand how to respect the landscape. So in this section, we will not be disclosing location hotspots, but instead will be teaching you how to find your own!
Step 1: Finding a creek
There are a few ways you could go about this. Maps and satellite imagery are a good starting point. Look for small waterways, natural drainage corridors, wooded low areas, and places where roads cross creeks. Bridges and culverts can reveal flowing water that isn't obvious on satellite imagery. Keep in mind that many small drainage ditches and seasonal creeks aren't clearly marked online, so eventually you'll need to investigate promising areas in person.
Geologic maps can narrow the search further. The Summerville and Charleston area contains marine formations deposited when this part of South Carolina was underwater. For example, the Ashley Formation consists partly of phosphatic marine sediments, while the younger Chandler Bridge Formation contains quartz-phosphate sands and is known for abundant marine vertebrate remains. These formations occur at or relatively near the surface in portions of the region. Now, a geologic map won't tell you where the shark teeth are. Instead, use it as another clue. A creek cutting through or draining an area containing fossil-bearing sediments may be more worthy of investigation than a randomly selected drainage ditch. Note that these are not the only two fossil bearing formations!
Step 2: Get out on foot and survey creeks
Remember, many creeks and small drainage ditches are not clearly marked online. Because of this, it is worth getting out on foot and putting eyes on areas you are targeting. You would be surprised by how many small creeks you might find in areas where maps only show forest and brush. Now, as mentioned, it is important to put eyes on the creeks you are prospecting, but what exactly are you supposed to be looking for when you get there? We will address this in the next section.
If you're looking for an easy place to begin, there are a few well-known public areas around Summerville where shark teeth and other fossils are regularly found. These locations receive plenty of hunting pressure, so expectations should be reasonable, but they can be excellent places for a new hunter to learn what to look for. Large or exceptional finds are less common at heavily hunted public locations, but smaller shark teeth, ray plates, vertebrae, and other fossils can still be found.
• Sawmill Branch Creek - Public, with plenty of access points parallel to the Sawmill Branch trail. A popular spot being behind the Oakbrook YMCA in Summerville
• Doorchester Creek - Common access point at the west end of the big lots parking lot near KFC
• How to Recognize a Productive Area
Once you've found a creek, don't immediately start looking for shark teeth. First look at what the water is moving and concentrating. One of the best clues is naturally occurring gravel.
Look for rounded or weathered pebbles that appear to have been transported and tumbled by water. This is different from piles of sharp, angular rock that may have been introduced for roadbeds, drainage projects, or erosion control. Jagged granite, for example, isn't typical of the natural sediments around Summerville and may simply indicate imported construction material.
Other promising signs include:
• Dark phosphate pebbles or nodules
• Shell fragments
• Olive, brownish, or greenish silty sediment
• Visible transitions between different sediment layers (when examining the creek banks)
• Natural pockets of coarse material where the current slows or changes direction
However, don't write off a creek simply because its banks are covered with vegetation or the creek bottom is only sandy. The fossil-bearing material may be upstream or completely hidden beneath the creek bottom. If the surface appears sandy, use your hands to feel beneath the loose sand. Finding gravel underneath can be a good reason to investigate further.
Think of these features as clues, not requirements. You're looking for evidence that the waterway intersects fossil-bearing sediments and has enough flowing water to erode, transport, sort, and concentrate material.
• How to Search
Once you've identified a promising creek, the search becomes much more focused.
Start with material that has already been naturally exposed. Instead of searching every inch of the creek, look for places where that heavier material naturally accumulates. Pay particular attention to exposed gravel beds and naturally concentrated coarse material, especially around bends, shallow areas, and other places where changes in current allow heavier objects to settle. Slowly inspect the exposed surface for the recognizable shape or glossy enamel of a shark tooth.
If the creek bottom is sandy, and you've already determined that there is gravel material beneath the sand, then the next step would be to take up a few handfuls and load them into a colander to determine if the hidden material is characteristic of fossil bearing deposits.
This might take a bit of effort. You will be looking for things like weathered pebbles, hag stones, dark phosphate pebbles, shell fragments, other fossilized material like vertebrae or bone fragments.
If you are finding such material, it would be worth continuing to load a few more sifts because odds are, you will find a shark tooth in the mix as well. That of course is not a guarantee. However, the conditions suggest shark teeth may also be present.
After you load your colander or sifter, shake well in the water to remove sand and other debris. Dump the sifted material onto a flat surface and spread out evenly. Don't try to scan the whole thing at once or you might miss some teeth. Instead, scan slowly from left to right, working through the material gently with your hands.
Headlamps are very helpful for spotting small teeth within your sifted material, especially when the creek you're hunting in is heavily shaded by trees. The light from a headlamp helps differentiate the shine of wet rocks from the shine of tooth enamel.
Once you find a fossil, slow down and search the immediate area carefully. The same processes that concentrated one tooth may have concentrated others nearby.
For someone completely new to inland hunting, a guided creek hunt can shorten the learning curve considerably. Seeing a productive creek firsthand makes it much easier to recognize natural gravel, phosphate, sediment changes, and the types of places where fossils tend to appear when you later explore on your own.
• What to Bring
Creek hunting doesn't require a huge amount of equipment.
A good basic setup includes:
• Water shoes or boots: Creek bottoms can be muddy, uneven, slippery, and covered with shells or other sharp material
• Nitrile-coated gloves: Protects your hands from glass or other sharp debris while handling searching creek bottoms
• Collection bag: keeps your finds secure
• Sifter/colander: Useful for sorting and searching creek bottom material. Must not be used to dig into creeks.
• Headlamp: Surprisingly useful in deeply shaded creeks where tree cover makes spotting dark fossils difficult.
• Bug Spray: Mosquitoes and other insects can be relentless around shaded Lowcountry waterways.
• Drinking water: Stay hydrated - especially in the warmer months!
For more information on what to carry, visit Top 6 Must-Haves for Creek Hunting article or the Gear Recs page.
• Construction Site Hunting Overview
Construction and land development can create excellent opportunities for finding shark teeth in the Lowcountry. Excavation for roads, neighborhoods, drainage ponds, utilities, and building foundations can expose fossil-bearing sediments that may otherwise sit several feet below the surface.
Where to Look
Freshly disturbed ground is usually the best place to focus. Look for areas where excavation has cut into the natural sediment rather than simply spreading imported fill dirt across the surface.
Pay particular attention to drainage ponds, retention basins, ditches, cut banks, and piles of excavated material. Sediments containing phosphate pebbles, shells, weathered stones/gravel, or other fossil fragments are especially worth inspecting. Once you begin finding pieces of bone, shells, or small shark teeth, slow down as the surrounding material may contain more.
How to Search
Visual scanning is usually the simplest and most effective method. Walk slowly across exposed sediment and look for that famous triangular shark tooth shape, partially exposed cutting edges, porous roots, etc. After rain can be an especially good time to search because runoff washes loose sediment from the surface and can make newly exposed fossils easier to spot.
Rather than wandering randomly across a large site, concentrate on areas where erosion or excavation has exposed a particular layer. If you find several fossils along the same band of sediment, follow that layer and search it carefully. Spoil piles are also worth checking, since material excavated from deeper fossil-bearing layers may have been deposited there. If there was recent rain, first start by looking in the run-off lanes of the spoil pile as these spaces often expose material.
Always get Permission
Construction sites and undeveloped lots are typically private property, even when there is no fence or "No Trespassing" sign. Always get permission before entering or collecting fossils.
For active developments, permission may need to come from the property owner, developer, builder, or site superintendent. Simply explain that you are a recreational fossil hunter and ask whether you may search the exposed ground. If permission is granted, follow any restrictions on where and when you can search. Keep in mind that some sites will not allow visitors because of safety or liability concerns. If the answer is no, respect it and move on.
• River Hunting Overview
River hunting in the Lowcountry looks very different depending on whether you plan to scuba dive or search from the surface. For divers, the Cooper River is the main attraction. For non-divers, the Ashley River and its surrounding tidal creeks generally offer more accessible opportunities
For Divers: The Cooper River
For experienced fossil divers, the Cooper River is hard to beat. It is widely regarded as South Carolina's premier destination for fossil diving and is especially well known for producing large megalodon teeth, including exceptionally well-preserved specimens. Shark teeth and other fossils can become concentrated with gravel, phosphate, and other dense material along portions of the river bottom, creating productive areas for divers to search.
However, diving the Cooper River is not something to approach casually. It is considered blackwater diving, and visibility can range from poor to virtually nonexistent. Divers may also encounter strong currents, changing depths, boat traffic, submerged obstacles, and debris moving with the current. These conditions make experience, proper equipment, and familiarity with blackwater diving especially important.
If you are interested in diving the Cooper but are unfamiliar with the river, consider going with an experienced local fossil-diving guide or charter. Several operators in the Charleston area specialize in Cooper River fossil dives and can provide access to productive areas while helping divers navigate the river's challenging conditions.
For Non-Divers: The Ashley River
For non-divers, the Ashley River and its surrounding tidal creeks generally offer better opportunities than the Cooper. At low tide, exposed banks, creek margins, and fossil-bearing sediments can often be searched on foot or accessed by kayak, making these areas much more approachable for surface hunting.
Shark teeth, fossilized bone, shells, and other marine fossils can all be found in these environments. Megalodon teeth are possible as well, although large specimens are less commonly encountered than by divers searching productive areas of the Cooper River bottom.
The Cooper River, by comparison, offers relatively few accessible opportunities for productive bank hunting. For those who want to hunt the Lowcountry's rivers without scuba gear, the Ashley and its connected tidal creeks are generally the better place to focus.
4. Other Info
• Laws, Access, & Ethics
1) A state hobby license is required before collecting any fossils in public waterways
• This is most relevant for folks collecting in river bottoms, creek beds, and submerged areas. You are free to collect above the low water mark, but any collection occurring under water requires licensing.
2) Digging or the use of tools for collecting is prohibited
• Collection must occur with your hands only. People will often use their hands to sift through gravel beds or load a sifter in a creek. But you may not use the sifter to scoop creek beds.
• The use of any tools such as shovels or screwdrivers is also prohibited on public grounds, and can earn you a large fine as digging into the banks of creeks causes damage and premature erosion
3) Surface collecting on public beaches is generally free and unrestricted
• Do not dig large holes, disturb dunes, or enter protected areas.
• Some beaches and wildlife sanctuaries have additional restrictions.
4) Respect the environment and the folks around you!
• Leave beaches, creeks, and rivers better than you found them
• If it came with you on your hunt (wrappers, bottles, bags etc.) make sure it leaves with you
Lastly, laws can change so it is important for readers to verify local regulations themselves
• Identify Your Finds
Identifying a shark tooth can sometimes be just as rewarding as finding it. While our Fossil Tooth ID resource is still being expanded, there are several other great ways to identify what you have found.
Start by looking at the tooth's overall shape, size, serrations, root, and any distinctive features such as cusplets. Keep in mind that worn or broken teeth can be more difficult to identify, and teeth from the same species can vary depending on where they were positioned in the shark's mouth.
For a good local reference, check your South Carolina library for Shark Tooth Hunting in South Carolina by Ashley Oliphant, which includes information and images useful for identifying many of the fossils found throughout the state. Local fossil-hunting Facebook groups are another excellent resource. Experienced collectors are often happy to help identify unusual finds, and many groups maintain identification charts and other resources that you can save for future reference. When asking for an ID, include clear photos of both sides of the tooth, preferably next to a ruler or other scale for size.
• Where to Go Next
You now have the basics: where to look, how to search, what to bring, and how to identify what you find. From here, the best way to learn is simply to get out and start looking.
As you gain experience, explore some of our other resources to learn more about the fossils and landscape of the Lowcountry:.
• Geological History – Understand why marine fossils are found throughout the Lowcountry, including miles inland.
• Gear Recommendations – Find practical gear for beach, creek, and other types of fossil hunting.
• Articles – Dig deeper into topics like tides, fossil colors, shark tooth anatomy, and hunting techniques.
Most importantly, pay attention to what you see in the field. Learning to recognize productive sediment, fossil material, and the conditions that expose it will make finding your own hunting areas easier with time.